Assembling the X-ray Machine
- Before building the X-ray machine, make sure you have read and understand all the background information in the Introduction to Radiation & Radiation Safety. If you are building this to use for a science fair you may need prior approval. Check with your science fair rules carefully and read our guide to regulations for Projects Involving Hazardous Chemicals, Activities, or Devices.
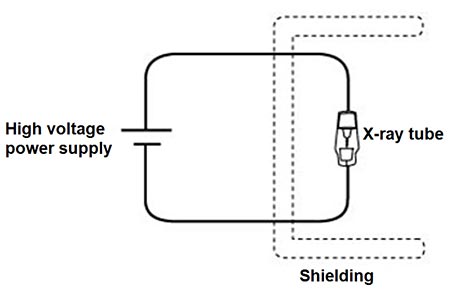
- Review Figure 1 below which shows that an X-ray machine is made up of three main parts: a high-voltage power supply that is hooked up to an X-ray tube with shielding around the X-ray tube for safety purposes.

Figure 1. The diagram shows the three main parts of a homemade X-ray machine: a high voltage power supply, an X-ray tube, and shielding for safety.
| Safety Check | |

|
This X-ray machine requires you to hook up and use a high-voltage
power supply. Exercise extreme caution when doing so. Accidental contact
with high voltage supplying sufficient energy can result in severe
injury or death. Furthermore, 20kV of electricity (which is the minimum
supplied by the power supply in this project) can easily jump several
inches, so do not allow anyone to touch or even come close (less than 8
inches) to the wires, alligator clips, or terminals on the X-ray tube
while the power supply is on. A person's body can provide a path for
current flow causing tissue damage and heart failure. Other injuries can
include burns from the arc generated by the accidental contact.
|

| X-rays are a form of ionizing radiation and can cause permanent
tissue damage and illness if you are exposed to too much. Read the Introduction to Radiation & Radiation Safety guide before building and operating this X-ray machine.
|
- Using alligator clips and 12 gauge (American Wire Gauge, AWG) hookup wire, connect the power supply to the X-ray tube.
- Warning: Do not plug in or turn on the power supply until it is all properly connected and the radiation shielding is in place. When working with the high voltage power supply, remember that the output can be deadly if mishandled.
- Make sure that you connect the X-ray tube in the right orientation. Because there is a positive end and a negative end to the tube (see Figure 2), connect the power supply so that current flows in the correct direction. Connect the positive output of the power supply to the tip of the tube and the negative end of the power supply to the base pins of the tube as shown in Figure 2.
- Note: Size 10 AWG wire will also work for making these connections. The size 10 and 12 AWG are both lower gauge wires, which are thicker, and thus better for higher voltages like the ones outputted by this power supply.
- Once the alligator clips are connected to the X-ray tube correctly, wrap electrical tape around the alligator clips and X-ray tube to secure the alligator clips in place.

Figure 2. Pay close attention to make sure the alligator clips attach the negative end of the X-ray tube to the negative end of the power supply and the positive end of the X-ray tube to the positive end of the power supply. Once they are in place, secure the alligator clips using electrical tape.

Figure 3. Connect the X-ray tube and power supply with alligator clips and hookup wire. To contain your setup you may find it easiest to build a wooden platform, like the one shown here, for your X-ray machine.
- Next, organize the placement of the power supply and the tube. There are two options:
- Option 1: Mount the power supply and X-ray tube on a wooden board as shown in Figure 3.
- This option allows the X-ray machine to be easily transported and is the option we will continue to depict in subsequent images.
- Mount the power supply using Velcro; secure the X-ray tube by feeding the attached wires though slots in the wooden mount.
- Option 2: Hide everything in some sort of container. The exact dimensions of the container depend on the size of the
power supply that you use, as well as what you're going to use the X-ray machine for (and thus which parts you need access
to often), but it is a neat way to keep everything out of sight and organized.
- Caution: In this design, the X-ray tube is more likely to overheat, so make sure to include an opening for a cooling fan.
- Dangerouslaboratories.com has an example of an X-ray machine housed in an old toolbox.
- Option 1: Mount the power supply and X-ray tube on a wooden board as shown in Figure 3.
- Set up the shielding material around the X-ray tube. This step is
critical for the safe operation of the X-ray machine. Depending on what
material you're using and what you intend to do with the machine, you
will have to place shielding in different ways around the tube.
Regardless of what you do with the shielding, keep an opening somewhere
on the shield for ventilation and cooling. Review the Introduction to Radiation & Radiation Safety document before making decisions about shielding.
- Shielding material: Lead and concrete are the two options for materials that are safe to use for shielding.
- Lead shielding: Lead is the traditional shielding material. It has a halving thickness of 0.4 inches (refer back to the Information about Radiation and Radiation Safety document for a discussion of what this means). To guarantee safety in this setup, there must be three halving thicknesses around the X-ray tube. This corresponds to a 1.2 inch thick enclosure of lead. Lead is the thinnest reliable shielding material and thus takes up the least amount of room, but it is much more expensive than concrete.
- Concrete shielding: You can also use concrete to effectively shield from X-rays. It has a halving thickness of 2.4 inches. To guarantee safety in this setup, there must be three halving thicknesses around the X-ray tube. This corresponds to a 7.2 inch thick enclosure of concrete. If you are using concrete, one of the cheapest means is to buy solid concrete blocks and use them to build a wall or dome around the tube. Make sure the blocks are solid concrete.
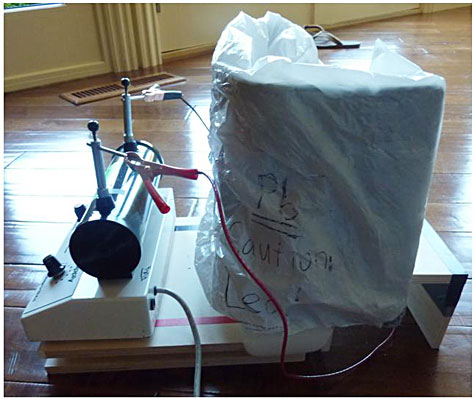
- Placement of the shielding. Exactly where you place the
shielding depends on what you plan to do with the X-ray machine. As
shown in Figure 4, the shielding always needs to be placed between the
X-ray tube and the power supply, so anyone turning the power supply on
and off is not exposed to radiation.
- If you want to irradiate objects or organisms in close proximity to the tube, you might want to shield the entire tube, leaving no openings (except the one for ventilation). You can form a concrete igloo around the tube with concrete bricks, or use lead sheets to completely cover the tube. This will keep the X-rays in the area enclosed by the shielding, as long as there is no opening in the material. Be sure to leave enough room for your sample (the object or organisms you want to irradiate) within the shielding enclosure.
- If you want to develop images with the X-rays, you should leave an opening in the side or top of the shielding so that a controlled stream of X-rays can escape for the imaging exposure. This opening should never be pointed toward where the machine user might stand or other people might walk by.
- If the X-ray machine is on a table, or on the floor of a multi-story building, you must put shielding below the X-ray machine. Similarly, if you are in a multi-story building with people above you, you must put shielding above the X-ray machine.
- Shielding material: Lead and concrete are the two options for materials that are safe to use for shielding.

Figure 4. In this experimental setup the lead shielding (wrapped in plastic for convenience) surrounds the X-ray tube on three sides. An opening in the shielding in the top allows ventilation and prevents overheating. The back is open as this particular machine was designed to be placed against a concrete wall during use. This machine was used in a one-story building, so it did not need shielding above or below it.
- Because there is a fire hazard related to high voltage wires, make
sure that the wires between the power supply terminals and the X-ray
terminals are short, hanging in the air, and not close to anything
(including lead shielding, another wire, and any metal in the floor,
such as nails). Keep the lead insulated from the wires with some
Styrofoam or rubber.
- Safety note: High voltage wires will try to arc to metal, and the insulation on the wires will not stop arcing. If there is any metal nearby, such as nails in the floor, uninsulated lead shielding, or another wire, the high voltage may arc through the insulation and to the piece of metal, possibly melting the insulation and catching the wires on fire, along with whatever was being arced to (such as the floor).
- Place a fan inside the shielding area so that it can move air around and out of the shield through the ventilation opening. This is very important, since the X-ray tube builds up heat that can interfere with the samples that you may be irradiating and can decrease the life of the tube. The fan will keep the temperature fairly constant and relatively cool.
- Find an appropriate place to use the machine. Try to place the machine in the corner of a room, ideally bordered by thick walls that can absorb radiation. Always test and calibrate the X-ray machine before use, as will be covered next in this guide.
Testing the Machine
Now that the machine has been built, you need to make sure that it actually works and that the shielding is sufficient. It is simple and safe to test whether the machine works and also to check for any problems. When using the X-ray machine, it is a good idea to post signs asking others to stay out of the room and to make sure that all pets and young children are also out of the room.- Make sure that the X-ray machine is unplugged and turned off. Turn on the Geiger counter. Record what the normal background radiation reading is.
- Next you will want to test the radiation reading when the X-ray
machine is on from behind the shielding, standing where the
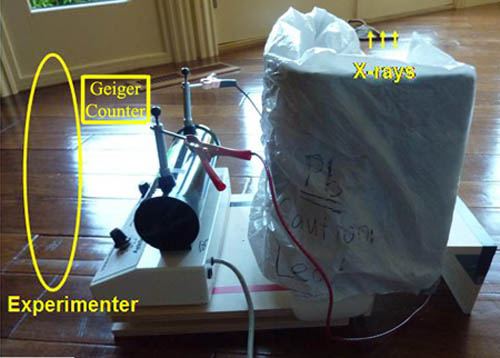
"Experimenter" is labeled in Figure 5 below. This will let you make sure
that the shielding is sufficient to protect you while you complete the
rest of the X-ray machine testing and calibrating steps.
- Turn on the fan.
- Stand away from the opening in the shielding, plug in the power
supply, and turn it to 30,000 volts (30kV). At this point the machine
is active and dangerous and is producing X-rays.
- Safety note: Other than the on/off button on the power supply, do not handle or be closer than 8 inches to the power supply, attached wires, alligator clips, or terminals on the X-ray tube while the power supply is plugged in. 30kV of electricity can easily jump several inches, and accidental contact could result in severe injury or death.
- Standing behind the shielding, where the "Experimenter" is labeled in Figure 5 below, hold the Geiger counter in your hand and take a radiation reading. Any Geiger counter readings above 300 microrem (µRem) per hour outside of the shielding is cause for concern. If you see such a reading, turn the machine off immediately and work on increasing the shielding. Even if the Geiger counter readings are below 300 µRem per hour, you may still want to increase the shielding. It depends on your total exposure. Read "Calibrating the X-ray Machine" below for more details.
- When you are done checking your shielding, turn off the power supply and unplug it.

Figure 5. To test that your shielding is working, turn on the X-ray machine and stand safely behind the shielding (the place labeled "Experimenter" in this image) with the Geiger counter in your hands.
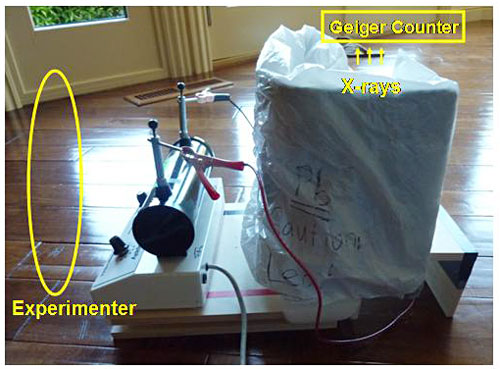
- Then, making sure the Geiger counter is still on, place it anywhere from 6 inches to 2 feet from the opening in the machine shielding so that you can read it from a safe vantage point. The idea here is to use the Geiger counter to see whether the machine is outputting X-rays after you turn it back on. You should not hold on to the Geiger counter during this test; instead devise a way to put it down but still read it from behind the shielding as diagramed in Figure 6 below.

Figure 6. To test that the X-ray machine is working, place a Geiger Counter a few inches from an opening in the shielding (a shelf above the ventilation opening would work) with the display face of the Geiger counter visible from a safe distance. The experimenter should stand safely behind the shielding, but still be able to read the Geiger counter.
- Turn on the fan.
- Stand away from the opening in the shielding, plug in the power
supply, and turn it to 30kV. At this point, the machine is active and
dangerous and is producing X-rays. The Geiger counter should be getting a
reading.
- Safety note: Other than the on/off button on the power supply, do not handle or be closer than 8 inches to the power supply, attached wires, alligator clips, or terminals on the X-ray tube while the power supply is plugged in.
- Observe the reading on the Geiger counter. From the moment that the
X-ray machine is turned on, the Geiger counter should have a much higher
reading than normal. If it has audio features, it might begin beeping
much more than usual. This indicates that the machine is working.
- Make sure you have tested what normal background readings are before you turn on the X-ray machine.
- If you were to place the Geiger counter right next to the vacuum tube (inside the shielding) while it is running, the counter could max out.
- Safety note: Radiation safety is usually thought of in terms of overall dose over time as opposed to an immediate exposure value. However, any Geiger counter readings above 300 microrem (μRem) per hour outside of the shielding is cause for concern. Turn the machine off immediately and work on increasing the shielding.
- When you are all done with your X-ray machine project, if you used lead shielding, you should not throw it away. You should recycle it instead. Check with local recycling centers to see if they accept lead.
Troubleshooting After the First Test
During the testing of the machine, you might encounter some problems. Here are a few, along with possible solutions.- Arcing—arcing (the visible jump of electrical current from one component to another) might occur either between the wires and some metal that you have nearby or between the wires themselves. Make sure that the wires are separated from each other and that they aren't near any other metal, including nails in the floor, or lead, if you are using that as shielding. Keep the lead insulated from the wire with some Styrofoam or rubber. Arcing can melt the insulation on the wires and cause it to catch fire, along with anything it is arcing to.
- No change in the Geiger counter reading—if the Geiger counter
doesn't detect any radiation when the power supply is turned on,
there's probably an issue with the wiring between the power supply and
the X-ray tube. Turn off the power, unplug the power supply, and check
that the polarity of the tube is correct (that it's oriented the right
way for current to flow through it) and that the power supply is working
correctly. Other possible problems include:
- The power supply might be missing a fuse, it might not be plugged in, or it might not be outputting enough voltage.
- The X-ray tube itself could be faulty.
- The Geiger counter could also be the problem, since it might not be able to detect gamma rays or X-rays.
- Check all of these things if you think there is a problem with the machine's ability to produce X-rays.
- After you get the X-ray machine working, be sure to re-test the shielding for radiation leaks (as described in the Testing the Machine section above, in step 2).
Calibrating the X-ray Machine
Now that the machine is working, you need to find out how much radiation it can output. You will need to find approximate exposure values at different areas in order to get an idea of your safety and the capability of the machine. Generally, the output energy of the X-rays is correlated directly to the input energy from the power supply. So 1 V of input energy should output 1 eV (electron volt) of X-ray energies. X-ray tubes can generally maintain this 1:1 ratio of input to output energy; the main difference among tubes is in the amount, or intensity, of X-rays produced. The calibration procedure is to determine the intensity of the X-rays in terms of exposure, as measured by a Geiger counter. You will make a table of values that you can refer back to for safety reasons and for radiation calculations later.- Make sure that the machine is turned off and unplugged. Place the Geiger counter 2 feet away from the X-ray tube, in line with the opening in the shielding. Turn on the Geiger counter.
- Turn on the fan. Stand away from the opening in the shielding, plug
in the power supply, and turn it to 20kV. Observe and record the reading
on the Geiger counter.
- Safety note: Other than the on/off button on the power supply, do not handle or be closer than 8 inches to the power supply, attached wires, alligator clips, or terminals on the X-ray tube while the power supply is plugged in.
- Repeat for various input voltages, such as 20kV, 30kV, 40kV, and 50 kV.
- Also repeat for various locations, such as at the power supply location, at your head level when you operate the machine, and at points throughout the area that you work in. Be sure to turn off the machine (i.e., turn off the power supply and unplug it) when you make any changes to the position of the Geiger counter.
- After testing you should have a table of values similar to Table 1 below.
| Power Supply Voltage | Geiger Reading at Each Location | ||||
| Two Feet from the X-ray Tube | Power Supply | Head Level | Far Corner of Room | Right Next to Shielding | |
| 20 kV | |||||
| 30 kV | |||||
| 40 kV | |||||
| 50 kV | |||||
| 60 kV | |||||
- The table of values should be sufficient to determine the radiation potential of the machine. If you are irradiating samples, then you can use this procedure to determine their exposure based on distance from the tube. Otherwise, this is useful as a benchmark for safety when using the machine.
- Safety notes:
- Radiation safety is usually thought of in terms of overall dose as opposed to an immediate exposure value. However, any Geiger counter readings above 300 μRem per hour outside of the shielding is cause for concern. Turn the machine off immediately and work on increasing the shielding.
- With radiation the answer is usually the less the better. Here are a couple of facts to keep in mind.
- A single chest X-ray or dental X-ray, both of which are considered to be medically safe, exposes a patient to 10 mrem of radiation. Limiting your exposure for a single experiment to 10 mrem would be similar to getting an X-ray.
- The international safety standard is 5,000 mrem or less per year. Your annual exposure, both normal and experimental, should fall below the 5,000 mrem level.
No comments:
Post a Comment